The main building blocks of an Angular application explained (Cup of Angular — part 1)
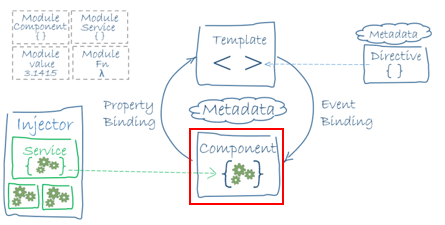
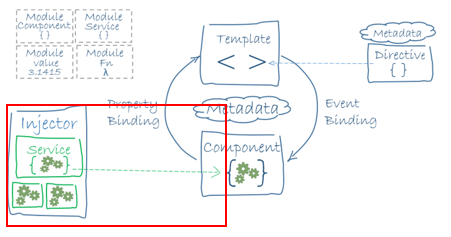
Have you been programming in Angular for a while, but still find this diagram frightening? Keep on reading!

I used to have this problem: I learned Angular as I went along, just learning task by task. So I knew how to code— but had this surprised face when my colleagues used the terminology.
If this problem sounds familiar — this article is perfect for you!
Before we start: Notice the syntax. Notice where names have a hyphen (-), where there is the use of camel case, where names start with a capital letter, etc. I also recommend you to run the examples with me and write them on your own (and use other names)— that’s how you learn best! StackBlitz is a great online code editor.

Here is a little table of contents for easy access:

For starters, I’ll share an analogy I found very useful:
Consider your angular application as a building. A building can have N number of apartments in it. An apartment is considered as a module. An apartment can have N number of rooms which correspond to components.

Now each apartment (module) will have rooms (components), lifts (services) to enable larger movement in and out the apartments, wires (pipes) to move information around and make it useful in the apartments.
You will also have places like swimming pool and tennis court which are being shared by all building residents. So these can be considered as components inside SharedModule.
(source: https://stackoverflow.com/questions/40073941/whats-the-difference-between-an-angular-component-and-module)
Now we’ll talk in more depth:
1. Modules

Modules are aimed for modularity and denoted by @NgModule.
Modularity means having the ability to disassemble the system, change parts, remove and add other parts easily, like Lego.
The module wraps a part of the system and provides a compilation context for components, services, etc. The purpose of a NgModule is to declare each thing you create in Angular and group them together, like packages in Java or namespaces in C#.
Note: An app always has a root module (conventionally named AppModule) that enables bootstrapping, and typically has many more feature modules.
“Bootstrapping” comes from the term “pulling yourself up by your own bootstraps”. In computing, a bootstrap loader is the first piece of code that runs when a machine starts, and is responsible for loading the rest of the operating system. [source: https://stackoverflow.com/questions/1254542/what-is-bootstrapping]
Don’t confuse it with Bootstrap — the most popular CSS framework for developing responsive and mobile-first websites.
For those of you who didn’t know (like me) — Mobile-first design is designing a mobile app and then adapting the layout that it can be viewed neatly on tablet and desktop devices without too many modifications.

Note that when creating a new component you need to import it to the corresponding module file and add the component to the declarations!
Angular loads as a collection of JavaScript modules. You can think of them as library modules.
For example, you might have a collections library that contains a List module, a Set module, and a Map module.
Each Angular library name begins with the @angular prefix. You install them with the node package manager npm and import parts of them with JavaScript import statements.
2. Components
Components are denoted by @Component. A component is a piece of the screen: visually and logically.
Below (in red squares) is an example for a reasonable way to divide a facebook page into components: Header, side-menu, commercials, feed, post creating section, etc.
Note: Facebook doesn’t use Angular, but I just used it as an example of a website which most of us use.

Components usually have .js, .html and .css files.
HTML gives the structure, CSS (or SCSS) gives the style, and JavaScript (or TypeScript) gives the interactivity!
In the sequel of this article, I talk in more depth about JS and TS. But in the meantime, know that TS is JS with data types and that TS code is translated to plain JS code during compilation.
Sometimes you will see CSS files and sometimes SCSS files, depending on what is configured in ng new. ng new creates a project in angular:ng new cup-of-code --style=scss, and the default is CSS. The line in the example creates a new project named cup of code and sets the style flag to SCSS.
I won’t go into it in-depth, but just note that SCSS is Sassy CSS.
Sass is a meta-language on top of CSS that’s used to describe the style of a document cleanly and structurally, with more power than flat CSS allows. SCSS is fully compatible with the syntax of CSS while still supporting the full power of Sass. For more information on SCSS click here.
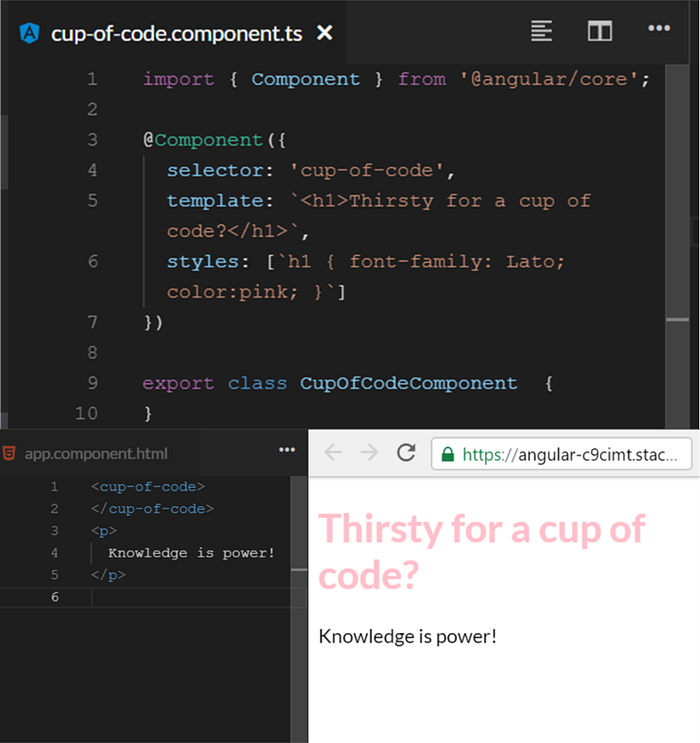
In the example above I created a component called cup-of-code.
In this case, there are no external .html nor .css files for cup-of-code , their content is in the .ts file, inside the component’s metadata because they are small and simple (will be explained more in the future).
Then you can see in app.component.html the usage of the cup-of-code component. I call it by using the component’s selector.
Lastly, we see the output of our code: The pink title is our cup-of-code component, and the black paragraph is from app.component.html.
The component’s logic is defined inside a class, and this class connects to the view via the properties and methods’ API (It will become clearer later).
3. Templates
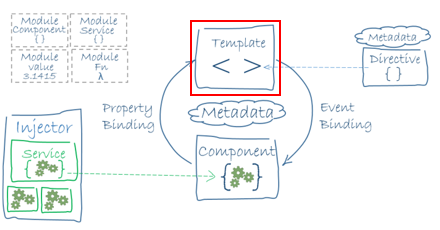
The page display can be defined internally — by template: and a piece of code, or externally — by templateUrl: and a directory to the compatible .html file.
In the previous screenshot, there is an example for template: usage, and in the next screenshot there is a usage of templateUrl:
4. Metadata
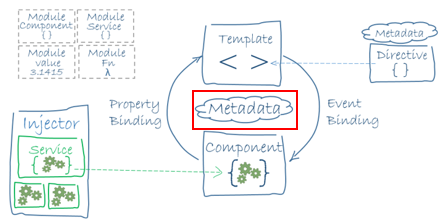
It sounds scary, but it’s just the information saying what to do with the class. For example:
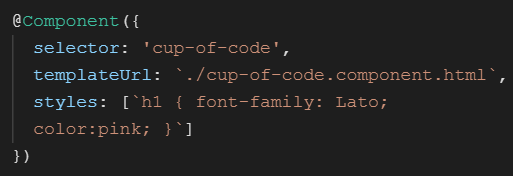
In the example above we see a component decorator that receives a configuration object.
The fields in the configuration object vary, but the most common are:
selector: the CSS element selector that represents the component. For every place that this selector appears in the HTML file, Angular will insert this component’s view.
templateUrl/template: We’ve talked about it already. Check if you remember without peeking!
styleUrls/styles: Same as templates, but for CSS files. Notice that there can be only one template URL but multiple style URLs!
5. Data binding
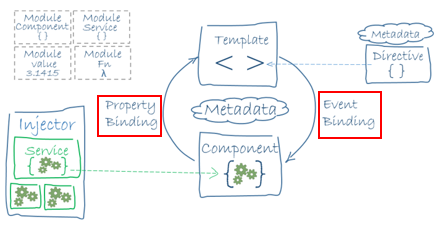
This subject is pretty easy, the complex part is to remember which name represents which direction, and uses which symbol.

a. One way binding: A bind from the component to the DOM (Document Object Model, HTML is a kind of DOM). In our example, in line 2 we created an attribute called sentence and bound the h1 tag to it.

b. Property binding: A property is a data variable of the component, so binding to property means being notified when the property changes — that means, from the component to the DOM.

You can see below that changing the property in the DOM doesn't affect the variable sentence . If it had an effect, we would’ve seen all the inputs change, including the one in the two-way binding paragraph.

Here is another example:

In this example, the cup-of-code component has two properties: sentence and drink. When using this component, we bind our sentences “My favorite drink is” and “coffee” to these properties.
- Notice that I used the
@Input()notation and that I added it to the imports from @angular/core. - In the second variable, I used two different names: from the outside, it is called
type-of-drinkand from inside the component it is calleddrink.
c. Attribute binding: This one is binding between an element’s attribute to the element that uses it. In the example below the bind is from the image’s src attribute to the ‘imageSrc’ property.
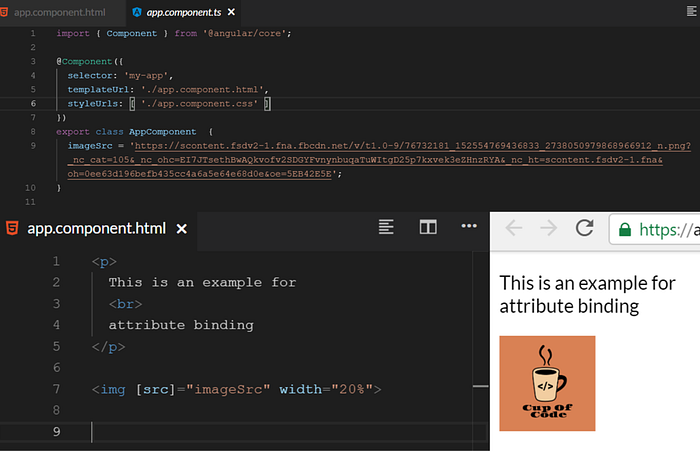
What is the difference between attributes and properties?
The difference is subtle.
Attributes are referring to additional information of an object.
Properties are describing the characteristics of an object.
Most people use these two words as synonyms.
[https://www.researchgate.net/post/What_are_the_differences_between_attribute_and_properties]
d. Two-way binding: Two-way binding means that changes on one side will impact the other side, and vice-versa.
There are two ways to create two-way binding: <input [(ngModel)]="typeOfDrink"> or<input [value]="typeOfDrink" (input)="typeOfDrink=$event.target.value">
Notice that you can use the double brackets only with ngModel!
Is it [()] or ([])? How will I remember?
The DOM is the side that is displayed (outside), and the component is internal (inside) — So, the squared brackets will be outside :)

In the example above, we changed the value where there is two-way binding and it changed all the fields on the page because the value of the property sentence has changed.
e. Event binding:
An event is created by the user and therefore it is from the DOM to the component. It’s also a way for the child component to update the parent.
In our example, the event is a change in the input’s value. So, when the user writes something else in the text box, the event is executed.

How do I remember which symbol represents which binding?
There are two directions: component -> DOM, and DOM -> component.
We’ll remember that the DOM is represented by squared brackets because all the screens that show HTMLs (at least until 2019) are squared, so we are left with round brackets representing the component.

The symbol in the HTML tag indicated who is affected. When there is [value] = "sentence" we know that the DOM is affected, and where there is (event) = "handler" we know that the component is affected.
6. Directives
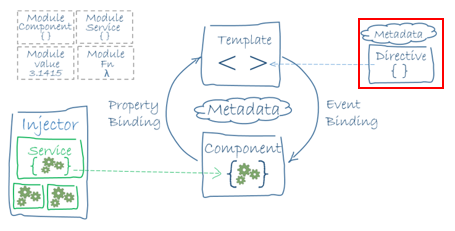
A directive in Angular is a .js/.ts class, which is declared with @Directive. That’s what lets you change the UI elements at runtime.
We have 3 types of directives in Angular −
- Components — directives with a template.
- Structural directives — change the DOM layout by adding and removing DOM elements.
- Attribute directives — change the appearance or behavior of an element, component, or another directive.
Component Directives
Components are the most common of the three directives. These form the main class having details of how the component should be processed, instantiated and used at runtime. We know those already.
Structural Directives
A structure directive basically deals with manipulating the DOM elements. Structural directives have an * (asterisk) before the directive: *ngIf ,*ngFor ,*ngSwitchCase.
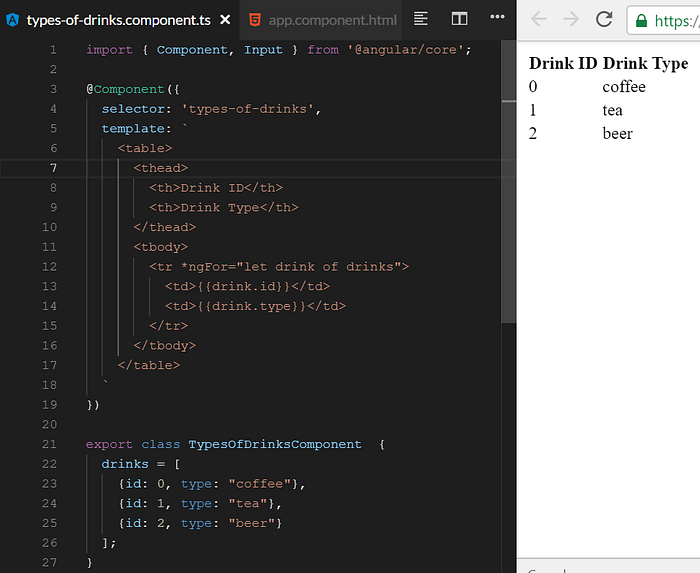
In the example above we see *ngFor usage. In the template, we created a table of drinks, and we go through them and insert theid and type on the table rows.
Attribute Directives
Attribute directives deal with changing the look and behavior of the DOM element. This is where you can create your own directives!
Note that directives must be declared in Angular Modules in the same manner as components.
We’ll build a simple appHighlight attribute directive to set an element’s background color when the user hovers over that element.
First, we’ll start by creating the directive:

Here we have a simple directive that changes the background color to yellow. It’s the brackets ([]) that make it an attribute selector.
Angular locates each element in the template that has an attribute named appHighlight and applies the logic of this directive to that element.
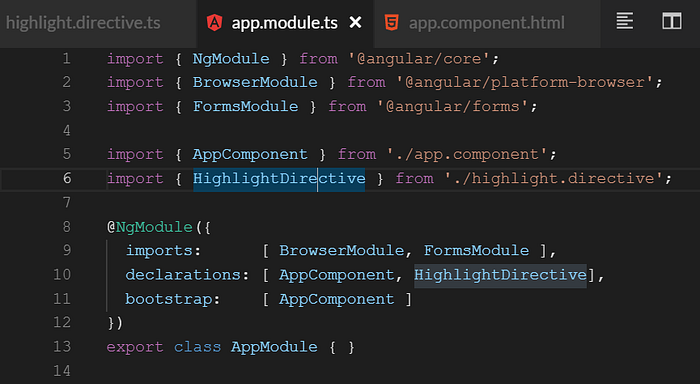
Don’t forget to declare the directive class in the root AppModule. If you create the directive class file in a terminal window with the CLI command ng generate directive, it will be declared automatically.
In the image below you can see theHighlightDirective declaration:
The last thing we need to do is use it!
In the image below you can see appHighlight usage:

Now we want to respond to user-initiated events:
Export the constructor’s content to a function named highlight().
Add two mouse events listeners: onMouseEnter(), onMouseLeave(). These listeners change the element’s background to yellow and transparent accordingly.
@HostListener is Angular’s decorator method that is used for listening to DOM events on the host element of both component and attribute directives.
Host elements are Angular components that are associated with a DOM element.
I’ll talk about decorators in the sequel of this publication.

And the output is:
You can also pass values into the directive with an @Input() data-binding, but we won’t get into that here.
To summarize, Angular found the appHighlight attribute on the host <p> element. It created an instance of the HighlightDirective class and injected a reference to the <p> element, into the directive's constructor which sets the <p> element's background style to yellow.
7. Services

Declared as @Injectable. A class that gives us the ability to use data in multiple components. It provides specific functionality not directly related to views and saves us from duplicated code.
For example, let’s say you have a DB on your project.
Writing an HTTP request each time you need to use GET,POST,PUT or DELETE methods creates code duplication.
Instead, you can create a data service that will do the requests and every component that needs data from the DB could inject that service.

8. Dependency injection (DI)
It sounds fancy but it just means inserting the service in the component’s constructor. This way you are making your code modular, reusable, and efficient. For more information read here.

Blogging is my hobby, so I happily spend time and money on it. If you enjoyed this blog post, putting 1 euro in my tipping jar will let me know :) Thank you for your support!

Resources that helped me:
http://www.kova.co.il/category/angular/page/2/
https://www.tutorialspoint.com/angular6/angular6_directives.htm
http://meta-pa.blogspot.com/2017/01/angular-2.html
https://medium.com/@cyrilletuzi/understanding-angular-modules-ngmodule-and-their-scopes-81e4ed6f7407
https://www.geeksforgeeks.org/difference-between-typescript-and-javascript/
https://dzone.com/articles/understanding-output-and-eventemitter-in-angular